MyPCPL Mobile App FAQs

  • General Questions

    Users begin the checkout process by tapping the Checkout button on the Home screen. The Checkout button is the icon that looks like a shopping cart.


    On the Checkout screen, users scan the barcode of the item they wish to check out using their device camera. Be sure to scan the Pima County Public Library barcode on the front of the item, not the purchase barcode on the back.

    If they prefer, they can also type the barcode from the Enter item barcode screen. To access the Enter item barcode screen, tap the keyboard icon at the top right of the Checkout screen.

    After scanning an item, users have the option to Check out item or add the item to their For Later shelf.

    The person must tap Check out item for the item to check out successfully.

    Selecting Check out item from the action sheet will check out the item to the user.

    As items are checked out to the user, they are added to the Items checked out screen.

    From here users can confirm items they've just checked out and view due dates.

    Tapping Finish will complete the check out process.

    From here the user can View items checked out or return to the Home screen.

    Items a user checks out using Checkout will be added to their Checked out screen on the My Borrowing tab.

    From My Borrowing users can view details of all checked out items, renew checked out items, and view due dates.


    If the user is unable to successfully scan an item using their device's camera they can try checking out by entering the item's barcode.

    The Enter item barcode screen is accessed from the keyboard icon displayed on the Checkout screen.

    From here, users can enter the item's barcode manually to try checking out an item.


    How to Add an Account

    It is easy to add more than one account. This is done by adding cards from the My Library Cards screen.

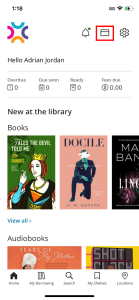
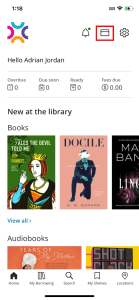
    1. On the Home Screen, tap on the library card icon.
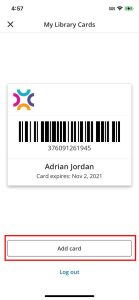
    2. From the My Library Cards screen tap ‘Add a card’.
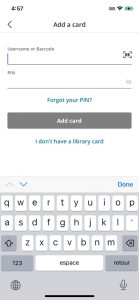
    3. Enter the login credentials for the card you would like to add. Logging in requires:
      • Library barcode (this is the 7- to 14-digit number on the library card) OR username.
      • PIN (personal identification number).
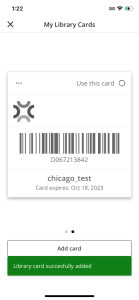
    4. Upon successful login, the library card will be added, but will default to an “inactive” state. If you would like to switch to this account immediately, then tap “Use this card”.

    Some additional notes:

    • There is a maximum limit of 8 cards that can be added.
    • When you log in with a new account from the login screen, that card is automatically added and will become the active account.
    • Added accounts do not persist across multiple devices you might have BiblioApps installed on. Accounts need to be added for each device separately.

    How to Switch an Account

    The active account can be switched from multiple places in BiblioApps.

    Switching accounts from My Library Cards

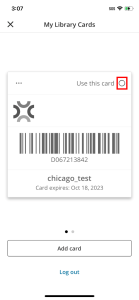
    1. Swipe to the card that you’d like to activate. (The currently active account is always the first card in the collection of cards).
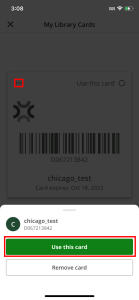
    2. To activate a card, tap on the Use this card button.
    3. Alternatively, tap on the ellipsis on the card to be activated, then tap on the Use this card button from the bottom sheet.
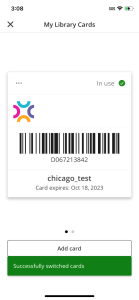
    4. Upon successful activation, a success message will be presented, and the activated card will take the first position.

    Additional notes:

    • A library card is still scannable when in an “inactive” state, so switching the account is not necessary for the purposes of scanning.
    • You can also switch accounts from the Setting screen. Tapping on ‘Manage cards' will take you to the My Library Cards screen.

    Switching Accounts Using the Avatar

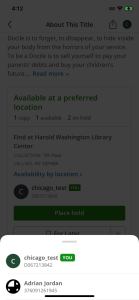
    Tapping on the user avatar brings up the account switcher. The avatar is visible on the following screens:

    • My Borrowing
    • My Shelves
    • Unregistering account
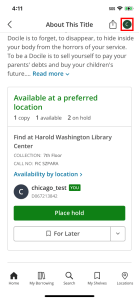
    • Bib page

    The avatar in the MyPCPL app looks like this:

    To switch accounts using the avatar:

    1. Tap on the avatar located at the top right of the screen.
    2. The account switcher will display from the bottom of the screen. Select the account you’d like to activate. (The currently active account is the first one presented, and displays the ‘YOU' label.)
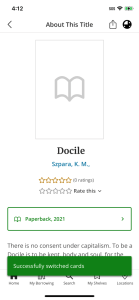
    3. Upon successful activation, a success message will be presented. The avatar will be updated to the newly active account.

    How to Remove an Account

    Removing accounts from BiblioApps is done from the My Library Cards screen.

    1. On the Home Screen, tap on the library card icon.
    2. Swipe to the card that is to be removed.
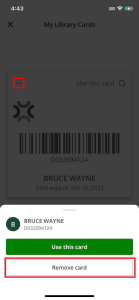
    3. Tap on the ellipsis, then tap on the Remove card button.
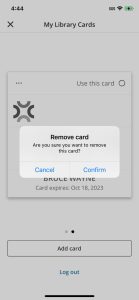
    4. The user will be asked to confirm removing the card.
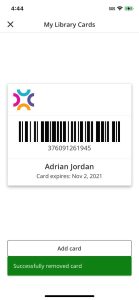
    5. Tapping on Confirm removes the card, and a success message is displayed.

    Additional notes:

    • The currently active account cannot be removed. To remove the card for the active account, activate a different card first.
    • Logging out of the app does not remove cards. Cards are removed explicitly by following the steps above. However, deleting the app does remove all the stored accounts. Upon reinstalling the app, cards will need to be added again.
    • Unregistering an account removes the card from the app.